Introduction
In this tutorial, we will demonstrate the technical implementation of low-code back-end Hypi APIs for an inventory management system and querying the Hypi APIs which it automatically generates when we build our data model known as schema. The CRUD APIs of Hypi will provide all the transactions functionality in our system.
Hypi helps to provide convenient scalable cloud applications and web services. It is best suited for the evolving business requirements. The technology is enhancing rapidly so the businesses around the world have to be efficient and time effective to carry out enormous business transactions on daily basis.
The front-end used in this demonstration will be Angular 10 application. This system will be able to increase the stock when needed and display the current situation of the present stock and modify the existing. We will query the instance we created in our Hypi App to get our desirable results.
Setup of the back-end
First we will make our back-end ready to plug with the front-end. The low-code Hypi APIs will make it so convenient and manageable to work with the stock details. The developer has to sign up for an account or use his or her existing Hypi account to create an app.
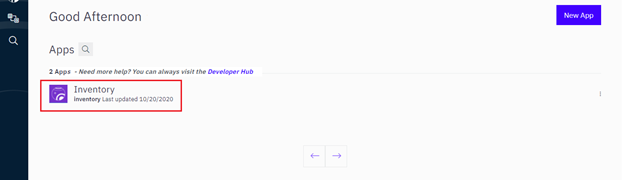
In the Apps page, the developer will create a new app. Here, we have created an app Inventory holding our necessary back-end implementations for the system. Next, we will go to the editor to make a graphql type definition schema for the inventory to make the transactions to the back-end and storing the stock information. It will act as a data model for our system.
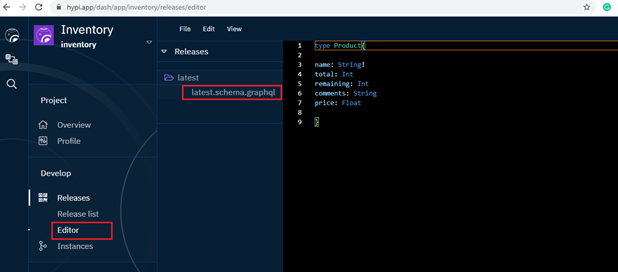
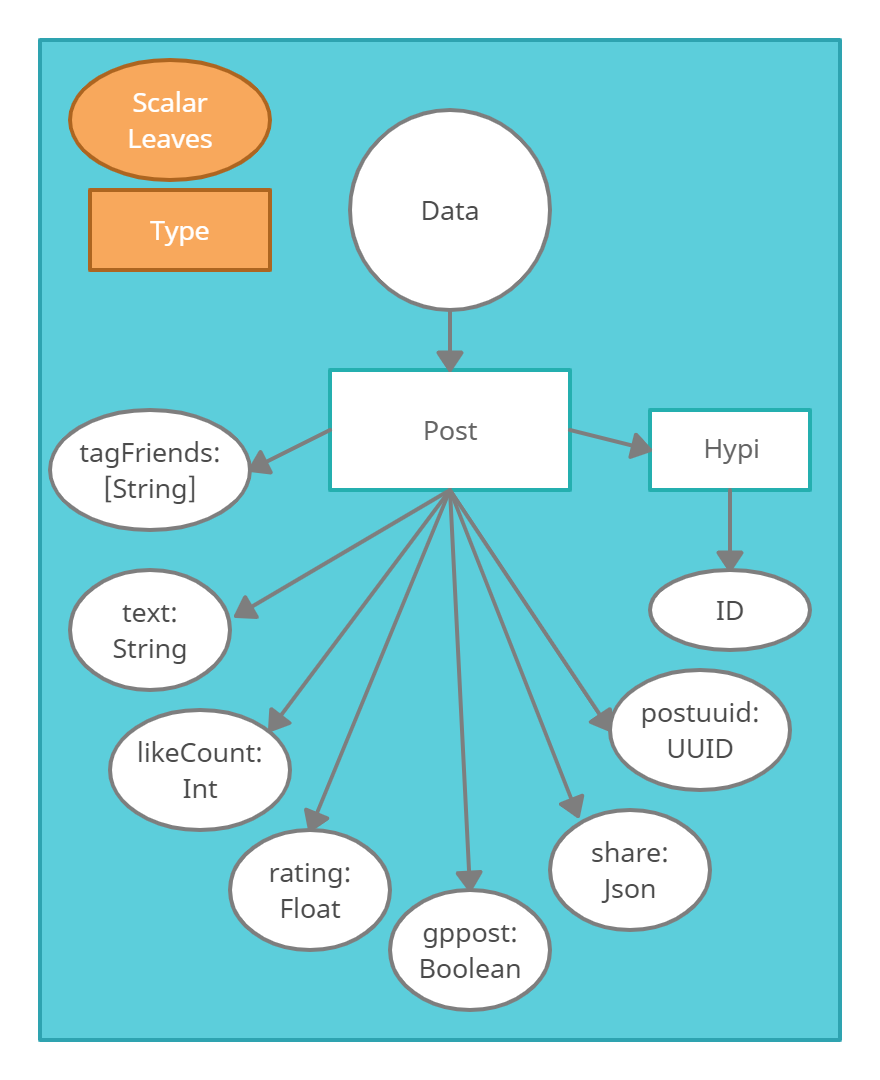
Here we have made an object type Product. This object will be responsible to manage the stock details of the system. After saving the schema, we will create an instance of this release named product-01.com. The interesting thing to note here is that the Hypi server will attach a special object named Hypi to this data type automatically. This behavior is same for any data type a developer develops in the Hypi server.
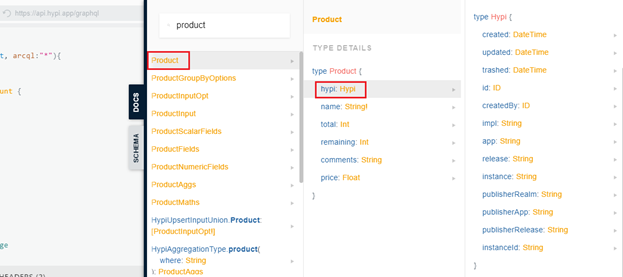
In the figure 3, we have accessed the docs tab from the API editor. Here, we can see that our newly created object Product is visible and the Hypi object is automatically attached. This object is very beneficial in terms of the members it contains. For e.g., its member id is technically very informative and it will act as a unique identifier of the specific instance of the Product. We have covered its implementation in this tutorial which will be shown later.
That’s it for the back-end configuration for our application. We can see here that how convenient the Hypi’s app is. A developer does not need to indulge himself or herself in lengthy technical coding part. The Hypi’s APIs will do this part for them. It helps the developers to remain and focus on the business domain of the application more efficiently and it is obvious that it is time saving as well.
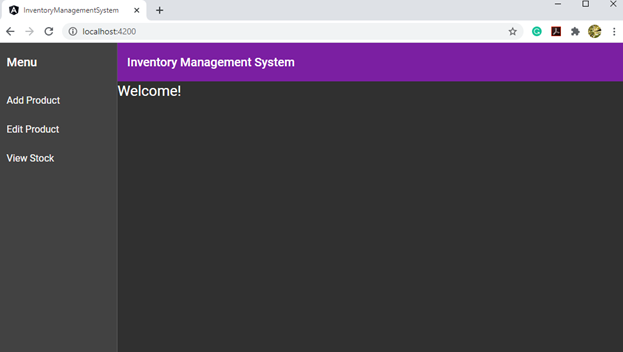
Angular 10 application setup
The structure of our angular application contains navigation and menu, build with the help of angular material 10. With the help of routing component, we will be able to navigate through our application. The interfaces are developed using angular material 10 UI components including BrowserAnimationsModules, MatToolbarModule, MatSidenavModule, MatListModule, MatFormFieldModule, MatInputModule, MatTableModule and many more.
The communication from the front-end to the back-end is fulfilled using an customized injectable component RequestsService.ts. It serves as service layer for our application. Using the HttpClientModule, POST requests are sent to the Hypi.
We have made a generic POST request call using function postRequest() in this .ts file. It takes two arguments, the domain and the payload. The purpose of this generic call is that any component in the app can call it using dynamic arguments.
File: requests.srvices.ts
 import {Injectable} from '@angular/core';
 import {HttpHeaders, HttpClient} from '@angular/common/http';
 import {map} from 'rxjs/operators';
 import {Router} from "@angular/router";


 @Injectable()
 export class RequestsService {

   constructor(private http: HttpClient, private router: Router) {
   }

   postRequest(domain: string, payload: string): any {

     const headers = new HttpHeaders()
       .set('hypi-domain', domain)
       .set('Authorization', 'eyJhbGciOiJSUzI1NiJ9.eyJoeXBpLmluc3RhbmNlIjp7InJlYWxtIjoiYXllc2hhIiwibmFtZSI6InN0b3JlIiwicmVsZWFzZSI6ImxhdGVzdCJ9LCJoeXBpLmxvZ2luIjp0cnVlLCJoeXBpLnB1cnBvc2UiOiJsb2dpbiIsImh5cGkudXNlcm5hbWUiOiJheWVzaGE5MDA5QGdtYWlsLmNvbSIsImF1ZCI6ImF5ZXNoYSIsImlhdCI6MTYwMzY5MTk4MCwiZXhwIjoxNjA2MjgzOTgwLCJzdWIiOiIwMUVKR0VFREpUS1haMzhKMEo1RUQ5V1BNUiIsIm5iZiI6MTYwMzY5MTk4MH0.p5EilLvriZAQjdwE1CH5wznqLHwww6tPz1F0NWkQgqBIRlj1OBBL3R77VhthhkQlqQmg41qbfroDf01C6VJ0kd7Wq7L8NJA8l4uGL24UgxvGaZgTGZ2CFaqcBDd0TPwbqBxW0-JXgm_1K4Lqg9Ww3m57O1zFnKVFYbTAump9qdksolar_-jUFgaAWvJ2BtSJ-AecJze9HXIdwYLqEblYE3utt9qjnzZX3WLuZAbP0UcqitdQ8YXsq8cJaDcuAHYEvBKtGzjrvRDNAGLkCqtvtlKxIciJt3vX5Ptc9ZpcyUfqF_Pe4vOygRPVDd_ngSwlP6v85_Ufpxnz0LDpU9bbug').set('Content-Type', 'application/json')
       .set('Accept', 'application/json');

     this.http.post('https://api.hypi.app/graphql', payload , {headers})
       .pipe(map(data => {
         console.log(data);
       })).subscribe(result => {
     });
   }
 }
In the postRequest() function, we have set the necessary headers information along with the instance name. in our case, it is product-01.com. The graphql API endpoint will remain single for all the transactions, i.e., it will be https://api.hypi.app/graphql. The graphql queries will be dynamic. It will be in payload variable.
Transactions of the Stock Products
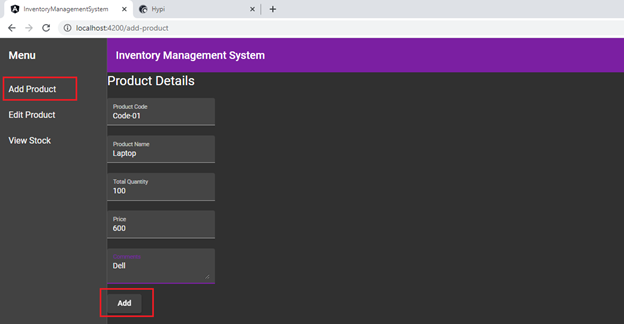
To add a stock item with the necessary details, we have an add product component. It will take all the information from the end-user and will call the postRequest() function with newly entered values. We have six fields of information for each of our stock product. These are code, name, price (per piece), total (available stock), remaining (remaining of this stock) and comments.
To add a stock product in our app in Hypi, we need a payload consisting of two parameters. First is graphql and the second is variables to be used in the graphql. The format of graphql along with the dynamic values will be as follows.
mutation {
upsert(
values: {
Product: [
{
hypi: { id: “Code-01” }
name: “Laptop”
total: “100”
price: 600.0
comments: “Dell”
remaining: “100”
}
]
}
){id}
}
The format of the variables will be as follows
variables: {value: {hypi: {id: “Code-01”}, name: “Laptop”, total: 100, price: 600.0, comments: “Dell”, remaining: 100}}
Here, we can see that the Hypi’s object is being used for the code of the product. So instead of using a separate member, we used the Hypi object’s id to uniquely identify our each stock product in the back-end.
In the typescript file, we have mapped the above two parameters in the typescript. A function addProduct() defines the logic of building a payload and sending it to Hypi’s API url through the POST request using the injectable class we discussed before. The two-way binding of variables is done using [(ngModel)] in the matInput.
File: add-product.component.ts
import { Component, OnInit } from '@angular/core';
 import {RequestsService} from '../requests.services';

 @Component({
   selector: 'app-add-product',
   templateUrl: './add-product.component.html',
   styleUrls: ['./add-product.component.scss']
 })
 export class AddProductComponent implements OnInit {

   code: string;
   name: string;
   total: string;
   remaining: string;
   comments: string;
   price: number;
   constructor(private req: RequestsService) {

   }

   ngOnInit(): void {
   }

   addProduct(){
     var values: string;
     var domain: string;

     //payload to send to Hypi
     values = JSON.stringify({
        variables: {
         value: {
           hypi: {id: this.code}, name: this.name,
           total: this.total, price: this.price, comments: this.comments, remaining: this.total
         }
       },
       query: 'mutation {upsert(values: {Product: [{hypi: {id: "'+this.code+'"} ' +
       'name: "' +this.name+'" total: '+this.total+' price: '+this.price+' ' +
       'comments: "'+this.comments+'" remaining: '+this.total+'}]}){id}} ' });

     //domain of our new release in Hypi
     domain = 'product-01.com';

     //using req object to call its postRequest()
     this.req.postRequest(domain,values);
   }
 }
On the console of our angular app, the response will be shown as the following.
 {
    "data":{
       "upsert":[
          {
             "id":"Code-01"
          }
       ]
    }
 }
To edit an existing stock product, our payload will be mostly the same. In our graphql, we will give the Hypi id of the product along with the details we want to edit. It is that simple. No big change, no hard logic. We just have to take care of the product code. It should be accurate.
File: edit-product.component.ts
  <!--  /* Font Definitions */  @font-face {font-family:"Cambria Math"; panose-1:2 4 5 3 5 4 6 3 2 4; mso-font-charset:1; mso-generic-font-family:roman; mso-font-pitch:variable; mso-font-signature:0 0 0 0 0 0;} @font-face {font-family:Calibri; panose-1:2 15 5 2 2 2 4 3 2 4; mso-font-charset:0; mso-generic-font-family:swiss; mso-font-pitch:variable; mso-font-signature:-469750017 -1073732485 9 0 511 0;}  /* Style Definitions */  p.MsoNormal, li.MsoNormal, div.MsoNormal {mso-style-unhide:no; mso-style-qformat:yes; mso-style-parent:""; margin-top:0in; margin-right:0in; margin-bottom:8.0pt; margin-left:0in; line-height:107%; mso-pagination:widow-orphan; font-size:11.0pt; font-family:"Calibri",sans-serif; mso-ascii-font-family:Calibri; mso-ascii-theme-font:minor-latin; mso-fareast-font-family:Calibri; mso-fareast-theme-font:minor-latin; mso-hansi-font-family:Calibri; mso-hansi-theme-font:minor-latin; mso-bidi-font-family:"Times New Roman"; mso-bidi-theme-font:minor-bidi;} pre {mso-style-noshow:yes; mso-style-priority:99; mso-style-link:"HTML Preformatted Char"; margin:0in; margin-bottom:.0001pt; mso-pagination:widow-orphan; font-size:10.0pt; font-family:"Courier New"; mso-fareast-font-family:"Times New Roman";} span.HTMLPreformattedChar {mso-style-name:"HTML Preformatted Char"; mso-style-noshow:yes; mso-style-priority:99; mso-style-unhide:no; mso-style-locked:yes; mso-style-link:"HTML Preformatted"; mso-ansi-font-size:10.0pt; mso-bidi-font-size:10.0pt; font-family:"Courier New"; mso-ascii-font-family:"Courier New"; mso-fareast-font-family:"Times New Roman"; mso-hansi-font-family:"Courier New"; mso-bidi-font-family:"Courier New";} .MsoChpDefault {mso-style-type:export-only; mso-default-props:yes; font-family:"Calibri",sans-serif; mso-ascii-font-family:Calibri; mso-ascii-theme-font:minor-latin; mso-fareast-font-family:Calibri; mso-fareast-theme-font:minor-latin; mso-hansi-font-family:Calibri; mso-hansi-theme-font:minor-latin; mso-bidi-font-family:"Times New Roman"; mso-bidi-theme-font:minor-bidi;} .MsoPapDefault {mso-style-type:export-only; margin-bottom:8.0pt; line-height:107%;} @page WordSection1 {size:8.5in 11.0in; margin:1.0in 1.0in 1.0in 1.0in; mso-header-margin:.5in; mso-footer-margin:.5in; mso-paper-source:0;} div.WordSection1 {page:WordSection1;} -->
   editProduct(){
     var values: string;
     var domain: string;
     values = JSON.stringify({
       variables: {
         value: {
           hypi: {id: this.code}, name: this.name,
           total: this.total, price: this.price, comments: this.comments, remaining: this.remaining
         }
       },
       query: 'mutation {upsert(values: {Product: [{hypi: {id: "'+this.code+'"} name: "'+this.name+'" total: '+this.total+' price: '+this.price+' comments: "'+this.comments+'" remaining: '+this.remaining+'}]}){id}} ' });

     domain = 'product-01.com';
     this.req.postRequest(domain,values);
   }
 }
In this function editProduct(), all the structure of the payload is same. Only the difference will be in the dynamic values entered from the end-user.
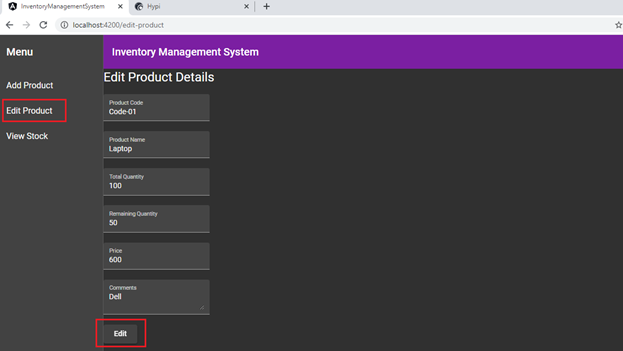
In the figure 6, we have Remaining Quantity field as well so that the remaining stock of the product can be maintained in the back-end.
The response from the Hypi is as follows
 {
    "data":{
       "upsert":[
          {
             "id":"Code-01"
          }
       ]
    }
 }
To view the current situation of all the stock products available in our inventory, the payload containing the graphql in parameter query will be as follows
{
    "data":{
       "find":{
          "edges":[
             {
                "node":{
                   "hypi":{
                      "id":"Code-01"
                   },
                   "name":"Laptop",
                   "price":600.0,
                   "total":100,
                   "remaining":50,
                   "comments":"Dell"
                },
                "cursor":"Code-01"
             },
             {
                "node":{
                   "hypi":{
                      "id":"Code-03"
                   },
                   "name":"LED",
                   "price":80.0,
                   "total":100,
                   "remaining":100,
                   "comments":"HP"
                },
                "cursor":"Code-03"
             },
             {
                "node":{
                   "hypi":{
                      "id":"Code-02"
                   },
                   "name":"Handsfree",
                   "price":60.0,
                   "total":50,
                   "remaining":50,
                   "comments":"Audionic"
                },
                "cursor":"Code-02"
             }
          ],
          "pageInfo":{
             "hasPreviousPage":false,
             "hasNextPage":false,
             "startCursor":"FIRST",
             "endCursor":"LAST",
             "pageLimit":25,
             "previousOffsets":[

             ],
             "nextOffsets":[

             ]
          }
       }
    }
 }
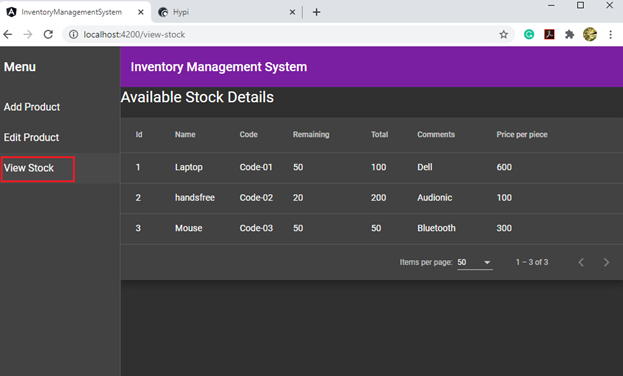
Talking about our angular app, we have view stock component. Its html contains mat-table angular material component’s selector because we have populated the mat-table with the stock values fetched from the back-end.
File: view-products.component.html
 <h1>Available Stock Details</h1>
 <app-data-table></app-data-table>
The logic for receiving data from the back-end is implemented in data-table.component.ts.
In our app, we have created an interface named inventory to hold our strong typed response from the Hypi we discussed above. Let us look at the implementation.
File: data-table.component.ts
Import …
import {inventory} from '../inventory';

domain: string;
 payload: string;
 inventoryDetail: inventory;

 constructor(private req: RequestsService, private http: HttpClient){

 }

 fetchData(){

  this.domain = 'product-01.com';
  this.payload = JSON.stringify({  query:'query { \n find(type: Product, arcql:"*"){ \n edges{\n node{\n... on Product {\n hypi{ \n id} \n name \n price \n total \n remaining \n comments}}cursor} \n pageInfo{hasPreviousPage \n hasNextPage \n startCursor \n endCursor \npageLimit \n previousOffsets \n nextOffsets}}}', variables: {'arcql': "*"} });
   const headers = new HttpHeaders()
     .set('hypi-domain', this.domain)
     .set('Authorization', 'eyJhbGciOiJSUzI1NiJ9.eyJoeXBpLmluc3RhbmNlIjp7InJlYWxtIjoiYXllc2hhIiwibmFtZSI6InN0b3JlIiwicmVsZWFzZSI6ImxhdGVzdCJ9LCJoeXBpLmxvZ2luIjp0cnVlLCJoeXBpLnB1cnBvc2UiOiJsb2dpbiIsImh5cGkudXNlcm5hbWUiOiJheWVzaGE5MDA5QGdtYWlsLmNvbSIsImF1ZCI6ImF5ZXNoYSIsImlhdCI6MTYwMzY5MTk4MCwiZXhwIjoxNjA2MjgzOTgwLCJzdWIiOiIwMUVKR0VFREpUS1haMzhKMEo1RUQ5V1BNUiIsIm5iZiI6MTYwMzY5MTk4MH0.p5EilLvriZAQjdwE1CH5wznqLHwww6tPz1F0NWkQgqBIRlj1OBBL3R77VhthhkQlqQmg41qbfroDf01C6VJ0kd7Wq7L8NJA8l4uGL24UgxvGaZgTGZ2CFaqcBDd0TPwbqBxW0-JXgm_1K4Lqg9Ww3m57O1zFnKVFYbTAump9qdksolar_-jUFgaAWvJ2BtSJ-AecJze9HXIdwYLqEblYE3utt9qjnzZX3WLuZAbP0UcqitdQ8YXsq8cJaDcuAHYEvBKtGzjrvRDNAGLkCqtvtlKxIciJt3vX5Ptc9ZpcyUfqF_Pe4vOygRPVDd_ngSwlP6v85_Ufpxnz0LDpU9bbug').set('Content-Type', 'application/json')
     .set('Accept', 'application/json');

   this.http.post<inventory>('https://api.hypi.app/graphql', this.payload , {headers})
     .pipe(map(data => {
       this.inventoryDetail = data;
       console.log(data);

     })).subscribe(result => {

   });

  }
In this component, we have imported the interface inventory and made its object to save the response data. The POST call will map the response data into the inventory object type. We can use the nodes array from inventoryDetail object as a datasource for our mat-table.
File: data-table.component.ts
ngOnInit() {

  this.fetchData();
  this.dataSource = new this.inventoryDetail.find.edges;

}
On the console window, the response will look like
{
    "data":{
       "find":{
          "edges":[
             {
                "node":{
                   "hypi":{
                      "id":"Code-01"
                   },
                   "name":"Laptop",
                   "price":600.0,
                   "total":100,
                   "remaining":50,
                   "comments":"Dell"
                },
                "cursor":"Code-01"
             },
                                 ...(more nodes)
          "pageInfo":{
             "hasPreviousPage":false,
             "hasNextPage":false,
             "startCursor":"FIRST",
             "endCursor":"LAST",
             "pageLimit":25,
             "previousOffsets":[
             ],
             "nextOffsets":[

             ]
          }
       }
    }
 }
Conclusion
In this tutorial, we have demonstrated the detailed technical implementation of Hypi low-code back-end service in angular 10 application. The business domain used is inventory management system. We have queried the graphql APIs the Hypi provided for our data model. It automatically generated CRUD APIs when we created the data model in our Hypi app. The Hypi object, attached to our data model type Product, provides a very convenient way to keep track and make transactions to our records in the Hypi back-end.
This application is tested and scalable. The developer can use many of the Hypi APIs to add more business scenarios in this application.